This tutorial is to showcase unattended and automatic install of multiple CentOS 6.5 x86_64 Hadoop nodes pre-configured with Ambari-agents and an Ambari-server host. After configuring automatic install of bare metal (No OS pre-installed) nodes, deploying a Hadoop cluster will be a matter of clicks. The setup uses:
- PXE boot (for automatic OS install)
- TFTP server (for PXE network install image)
- Apache server (to serve the kickstart file for unattended install)
- DHCP server (for assigning IP addresses for the nodes)
- DNS server (for internal domain name resolution)
- Puppet-master (for automatic configuration management of all hosts in the network, Ambari install included in Puppet manifests)
- Ambari-master and agents (for managing Hadoop ecosystem deployment)
The setup assumes that the nodes are on the 192.168.0.0/255.255.255.0 network, the master is on 192.168.0.1 and its hostname is bigdata1.hdp The domain for the network server by the configuration is hdp and the clients are named as bigdata[1-254].hdp Download all files here (configuration files, PXEBoot Linux image, Kickstart file and custom script for adding a node on the master).
Master Server
Install CentOS 6.5 X86_64 manually
- CentOS-6 updates until November 30, 2020
- Install guide
Configure network
dnsmasq
- Install and configure dnsmasq providing a basic DHCP, DNS and TFTP server. Easily configurable, ideal for internal networks
yum install dnsmasq
* _/etc/dnsmasq.conf_- DHCP setup
- DNS setup
- TFTP setup
#DNS
domain-needed
bogus-priv

domain=hdp
expand-hosts
local=/hdp/

listen-address=127.0.0.1
listen-address=192.168.0.1

#Local interface
interface=p4p1

#DHCP
dhcp-range=p4p1,192.168.0.100,192.168.0.200
#set default gateway
dhcp-option=p4p1,3,192.168.0.1

#DNS servers
server=192.168.0.1
server=8.8.8.8

#TFTP
enable-tftp
tftp-root=/var/lib/tftpboot
dhcp-boot=pxelinux.0

#Reserved IPs+MAC addresses will get added here by our custom script
- TFTP PXE boot files at /var/lib/tftpboot downloadable with the package above, containing
- Linux image
- Kickstart file
- Note config parameters below
- Root password for each client will be hadoop135
- Note config parameters below
# NFS server, CentOS image at /var/nfs
install
nfs --server 192.168.0.1 --dir /var/nfs
# Lang and keyboard
lang en_US.UTF-8
selinux --enforcing
keyboard us
skipx
# Network
network --bootproto dhcp --hostname bigdatax.hdp
# Root pw. is hadoop135
rootpw --iscrypted $1$wHydp2Aq$KmJuQFeHYTe8fMsV2tUga.
# Allow SSH
firewall --service=ssh
authconfig --useshadow --passalgo=sha256 --kickstart
timezone --utc UTC
# Configure services, add extra repos, Epel
services --disabled autofs,gpm,sendmail,cups,iptables,ip6tables,auditd,arptables_jf,xfs,pcmcia,isdn,rawdevices,hpoj,bluetooth,openibd,avahi-daemon,avahi-dnsconfd,hidd,hplip,pcscd,restorecond,mcstrans,rhnsd,yum-updatesd
repo --name="Extra Packages for Enterprise Linux" --mirrorlist=https://mirrors.fedoraproject.org/metalink?repo=epel-6&arch=x86_64
bootloader --location=mbr --append="nofb quiet splash=quiet"
zerombr
clearpart --all --initlabel
autopart
text
reboot
# Add Packages
%packages --ignoremissing
yum
dhclient
ntp
wget
mc
@Core
epel-release
puppet
%end
%post --nochroot
exec  /dev/tty3
#changing to VT 3 so that we can see whats going on....
/usr/bin/chvt 3
(
cp -va /etc/resolv.conf /mnt/sysimage/etc/resolv.conf
/usr/bin/chvt 1
) 2>&1 | tee /mnt/sysimage/root/install.postnochroot.log
%end
%post
logger "Starting anaconda bigdatax.hdp postinstall"
exec  /dev/tty3
# Changing to VT 3 so that we can see whats going on....
/usr/bin/chvt 3
(
# Update local time
echo "updating system time"
/usr/sbin/ntpdate -sub 0.fedora.pool.ntp.org
/usr/sbin/hwclock --systohc

# Update all the base packages from the updates repository
yum -t -y -e 0 update

# And add the puppet package
yum -t -y -e 0 install puppet

echo "Configuring puppet"
cat > /etc/puppet/puppet.conf


vardir = /var/lib/puppet
logdir = /var/log/puppet
rundir = /var/run/puppet
ssldir = $vardir/ssl


pluginsync      = true
report          = true
ignoreschedules = true
daemon          = false
ca_server       = epmhubd1.hdp
certname        = epmhubdx.hdp
environment     = ambari_dev
server          = epmhubd1.hdp

EOF

# Setup Puppet to run on system reboot
/sbin/chkconfig --level 345 puppet on

# Register Puppet, download config files
/usr/bin/puppet agent --config /etc/puppet/puppet.conf -o --tags no_such_tag --server bigdata1.hdp --no-daemonize

sync

%end
- Install Apache
yum install httpd
* Move Kickstart default file to _/var/www/html/kickstart_- Start Apache
- Check if kickstart is available at http://bigdata1.hdp/kickstart
- Start Apache
Install NFS
yum install nfs-utils nfs-utils-lib
* Edit _/etc/exports_ and point it to your NFS shared folder- In our case /var/nfs
- Download the CentOS 6.5 x86_64 DVD ISO Image to this location from here: http://wiki.centos.org/Download
Puppet master setup
- Puppet provisioning settings originally from
- https://blog.codecentric.de/en/2014/04/hadoop-cluster-provisioning/
- Modified repository information
- Puppet classes sets
- NTP Clock Sync
- Host information
- Installs Ambari Agents with node specific hostname settings
- https://blog.codecentric.de/en/2014/04/hadoop-cluster-provisioning/
- Puppet provisioning settings originally from
node 'bigdata2.hdp' {

# VM-Configuration of an ambari agent that is monitored by the ambari server.

# Turn off interfering services
include interfering_services

# Install and enable ntp
include ntp

# Ensure that servers can find themselves even in absence of dns
    class { 'etchosts':
      ownhostname => 'bigdata2.hdp'
    }


    class { 'ambari_agent':
      serverhostname => "bigdata1.hdp",
      ownhostname    => "bigdata2.hdp"
    }

    # Establish ordering
    Class['interfering_services'] -> Class['ntp'] -> Class['etchosts'] -> Class['ambari_agent']

}
- IPtables configuration for Internet sharing, DHCP, TFTP, DNS
- Edit /etc/sysctl.conf add net.ipv4.ip_forward = 1 for allowing Net interface MASQ to Loc (internet connection sharing from internet network interface to local - needed for getting Ambari Repos)
- Ensure that all ports configured below have running services and are accessible - otherwise install of hosts won’t work
echo 1 > /proc/sys/net/ipv4/ip_forward

# wlan0 is the external network, p4p1 is the lan, internal network
iptables -t nat -A POSTROUTING -o wlan0 -j MASQUERADE
iptables -A FORWARD -i wlan0 -o p4p1 -m state  --state RELATED,ESTABLISHED -j ACCEPT
iptables -A FORWARD -i p4p1 -o wlan0 -j ACCEPT

# allow TFTP
iptables -A INPUT -i p4p1 -s 192.168.0.0/24 -p udp --dport 69 -m state --state NEW,ESTABLISHED -j ACCEPT

# allow DHCP
iptables -A INPUT -i p4p1 -s 192.168.0.0/24 -p udp --dport 67:68 -m state --state NEW,ESTABLISHED -j ACCEPT

# allow DNS
iptables -A INPUT -i p4p1 -s 192.168.0.0/24 -p udp --dport 53 -m state --state NEW,ESTABLISHED -j ACCEPT

# allow NFS
iptables -A INPUT -i p4p1 -s 192.168.0.0/24 -p tcp --dport 1025 -m state --state NEW,ESTABLISHED -j ACCEPT

# allow HTTP
iptables -A INPUT -i p4p1 -s 192.168.0.0/24 -p tcp --dport 80 -m state --state NEW,ESTABLISHED -j ACCEPT

service iptables save
service iptables restart
Custom script to add a new host
* A simple and not too elegant Bash script to add a new host- Remark: checking input format, hostname as parameter, removing a host is a future task, still it works as-is
- ./script.sh 00:11:22:33:44:55 96 parameter is the MAC address of a client
- Steps
- Reads the MAC and Counter values from counter.txt in the same directory (counter = 192.168.0.counter value of machine name and IP)
- Adds MAC and IP to /etc/dnsmasq.conf to have a fixed, DHCP assigned IP address
- Adds the node’s hostname to /etc/hosts file for DNS to work (dnsmasq DNS server reads entries from there)
- Adds a TFTP entry with the MAC address for PXE boot to /var/lib/tftpboot/pxelinux.cfg/-01-mac
- Adds the Kickstart file to /var/www/html with modified host and IP data for unattended install
- Adds Puppet config files to /etc/puppet/manifests/site.pp for the specific node to intall NTP and Ambari-agent on the node
- Increments Counter for the next host
#/bin/bash

if [ $# -eq 0 ]
  then
printf "Need a MAC address in format 00-11-22-33-44-55"
fi

macdash=$1
macpoint=`printf $macdash | sed 's/-/:/g'`
#This is to store the end of IP address of range 192.168.0.0 / 255.255.255.0
var=`cat counter.txt`

# Modify dnsmasq.conf

printf "
#bigdata`echo $var`
" >> /etc/dnsmasq.conf
printf "dhcp-host=`echo $macpoint`,192.168.0.`echo $var`" >> /etc/dnsmasq.conf


# Modify hosts

printf "
192.168.0.`echo $var` bigdata`echo $var`.hdp" >> /etc/hosts

# Add MAC to TFTP

/bin/cp -rf /var/lib/tftpboot/pxelinux.cfg/copy /var/lib/tftpboot/pxelinux.cfg/01-`echo $macdash`
sed "s/kickstart/kickstart$var/g" /var/lib/tftpboot/pxelinux.cfg/01-`echo $macdash` > /var/lib/tftpboot/pxelinux.cfg/`echo $macdash`_tmp
mv -f /var/lib/tftpboot/pxelinux.cfg/`echo $macdash`_tmp /var/lib/tftpboot/pxelinux.cfg/01-`echo $macdash`

# Add Kickstart file

/bin/cp -rf /var/www/html/kickstart /var/www/html/kickstart`echo $var`
sed "s/bigdatax/bigdata$var/g" /var/www/html/kickstart`echo $var` > /var/www/html/kickstart`echo $var`_tmp
mv -f /var/www/html/kickstart`echo $var`_tmp /var/www/html/kickstart`echo $var`

# Modify Puppet Manifest

printf "

node 'bigdata`echo $var`.hdp' {
" >> /etc/puppet/manifests/site.pp
printf "  include interfering_services
  include ntp
" >> /etc/puppet/manifests/site.pp
printf "  class { 'etchosts':
    ownhostname => 'bigdata`echo $var`.hdp'
  }
" >> /etc/puppet/manifests/site.pp
printf "  class { 'ambari_agent':
    serverhostname => "bigdata1.hdp",
    ownhostname => "bigdata`echo $var`.hdp"
  }
" >> /etc/puppet/manifests/site.pp
printf "  Class['interfering_services'] -> Class['ntp'] -> Class['etchosts'] -> Class['ambari_agent']
}" >> /etc/puppet/manifests/site.pp

# Restart
service dnsmasq restart

var=$((var+1))
printf $var > counter.txt
Clients
Clients automatically installs on boot from network interface if their MAC address have been added to the system by using the above script. Select Boot media: PXE boot when starting the machine.
Provisioning
- Use Puppet manifests: http://docs.puppetlabs.com/learning/
- For configuration management of your hosts. With Puppet you can batch apply system configurations and send commands to your hosts.
- Current script installs Ambari-Agent
- SSH login is available
Install Hadoop (with Ambari)
Install Ambari-Server and Agent on the master host computer with pre-configured Puppet Manifest
- Edit /etc/puppet/environments/ambari_dev/manifest/one.pp in case default hostnames need to be changed
- Run to configure Ambari repository
puppet apply /etc/puppet/environments/ambari_dev/manifest/one.pp
* Setup and start Ambari
ambari-server setup
ambari-server start
* * Point your browser to http://bigdata1.hdp:8080- Log in to the Ambari Server using the default username/password: admin/admin.
* Install
This guide will not detail Ambari and Hadoop settings. A default install will put together a cluster of Hadoop. Download all files here (configuration files, PXEBoot Linux image, Kickstart file and custom script for adding a node on the master).
Ambari Tutorial
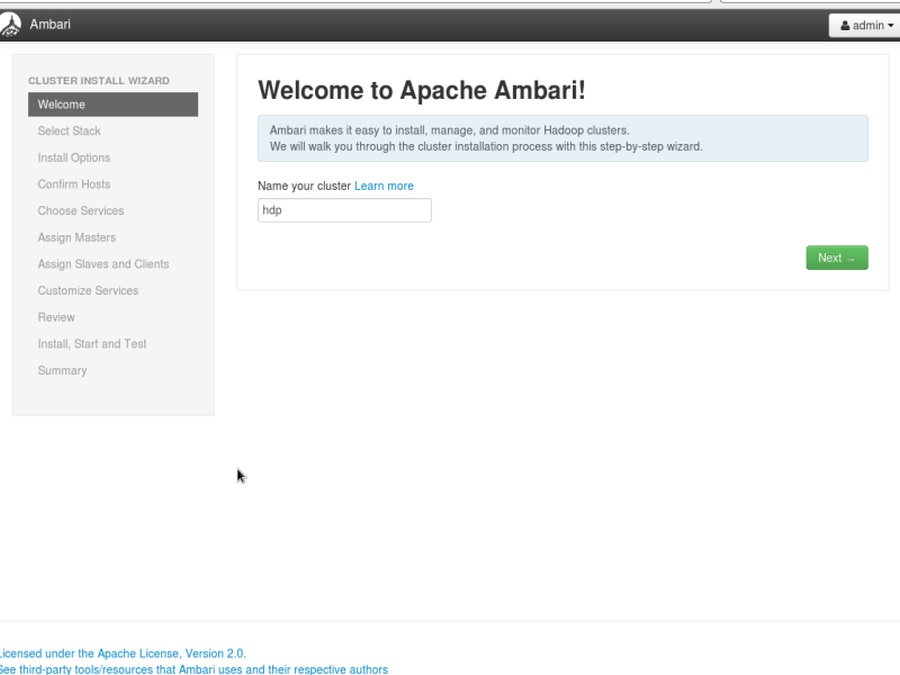
- Open browser on bigdata1:8080
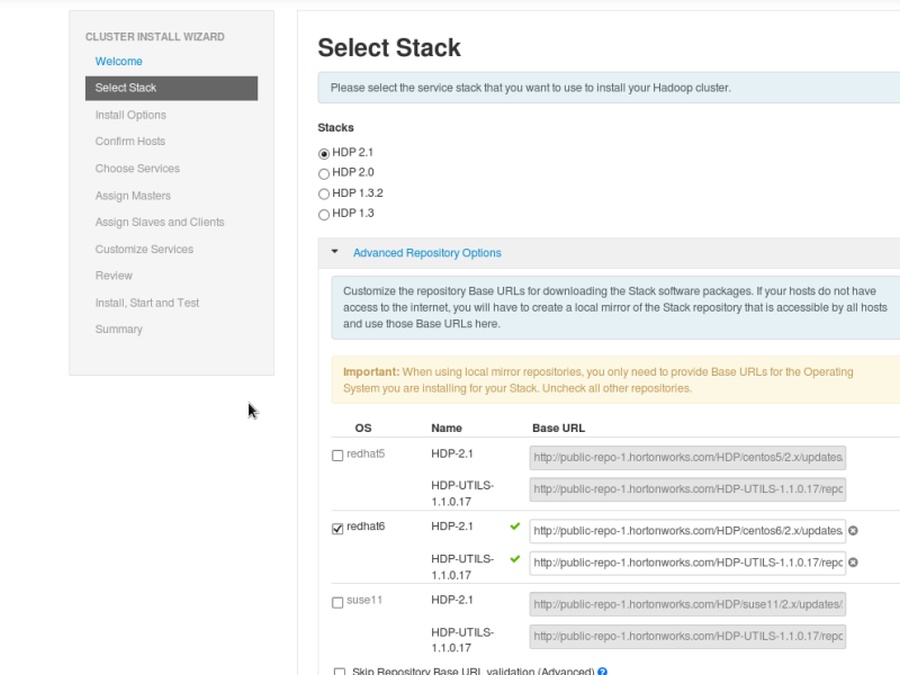
- Choose HDP’s version (HDP 2.1) and repository of your OS (Centos6 will use Redhat6 repo)
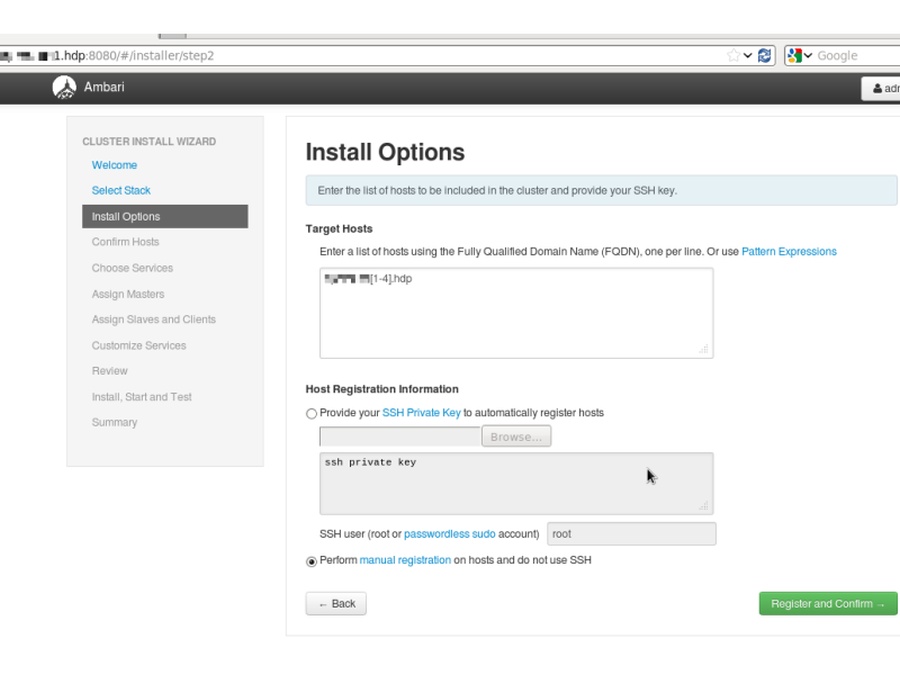
- Add your hosts, you can use regular expressions like bigdata[0-200].hdp, choose manual registration as Ambari-Agents are already installed
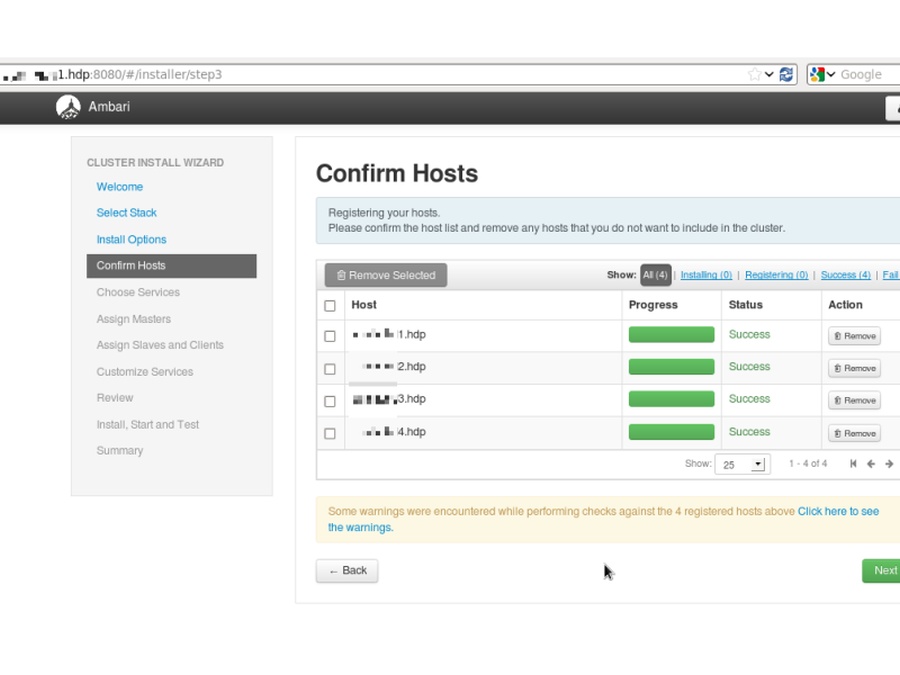
- Ambari will recognize all Agents in case those are properly installed and network with DNS is configured by using Dnsmasq as above
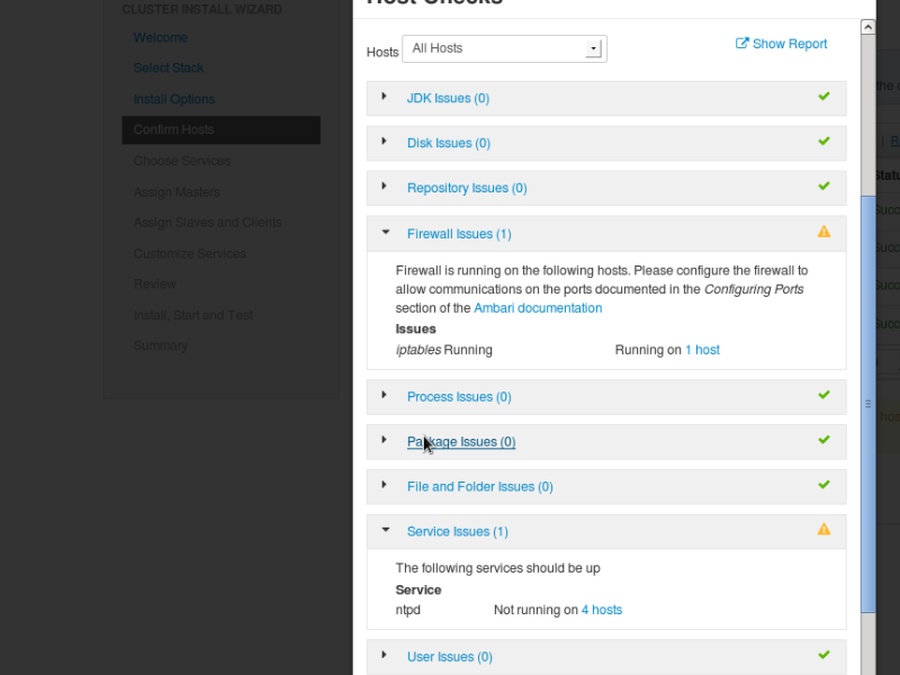
- Pre-deploy screens assesses confronting packages and issues that might cause errors
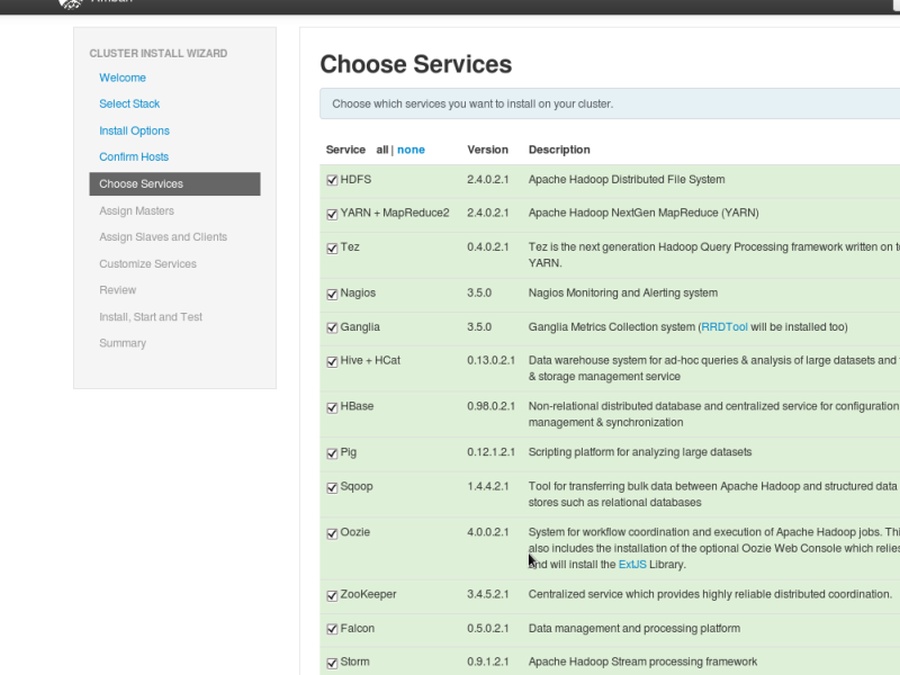
- Choose the Hadoop components to be deployes on your clusters
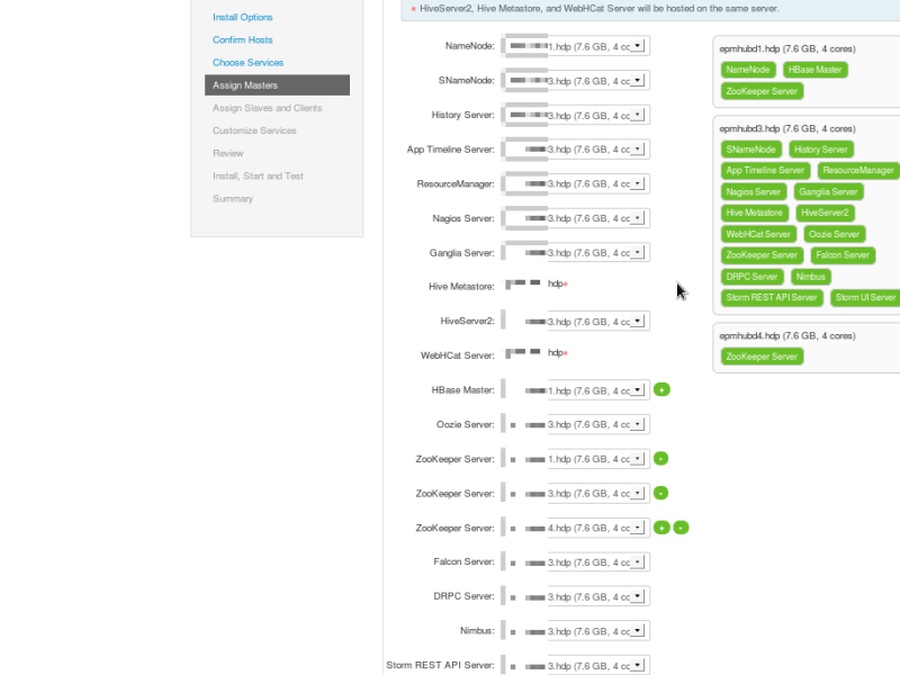
- Assign masters for the services of your cluster
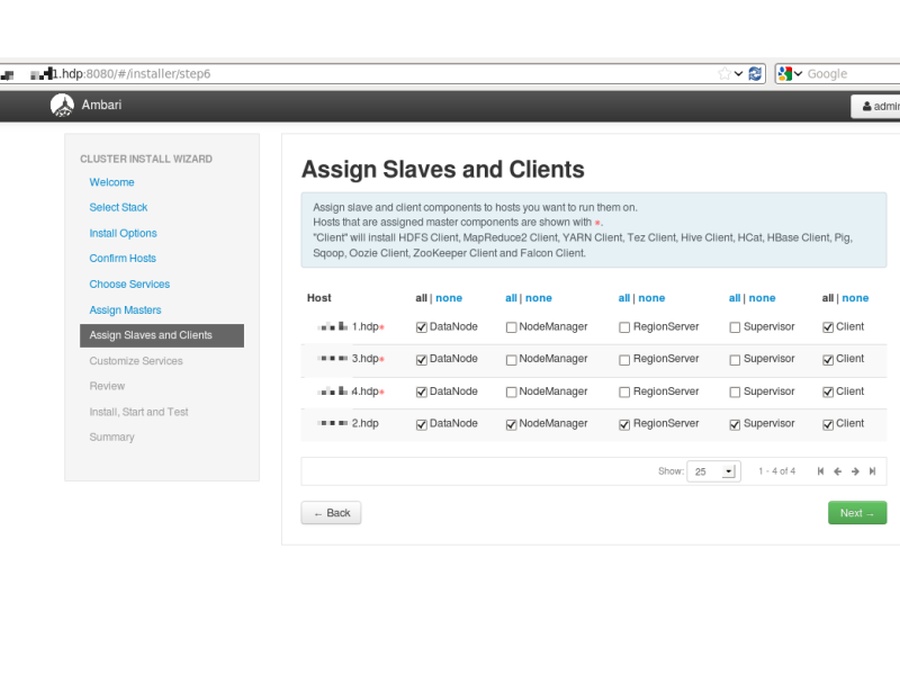
- Assign slaves and clients for the services of your cluster
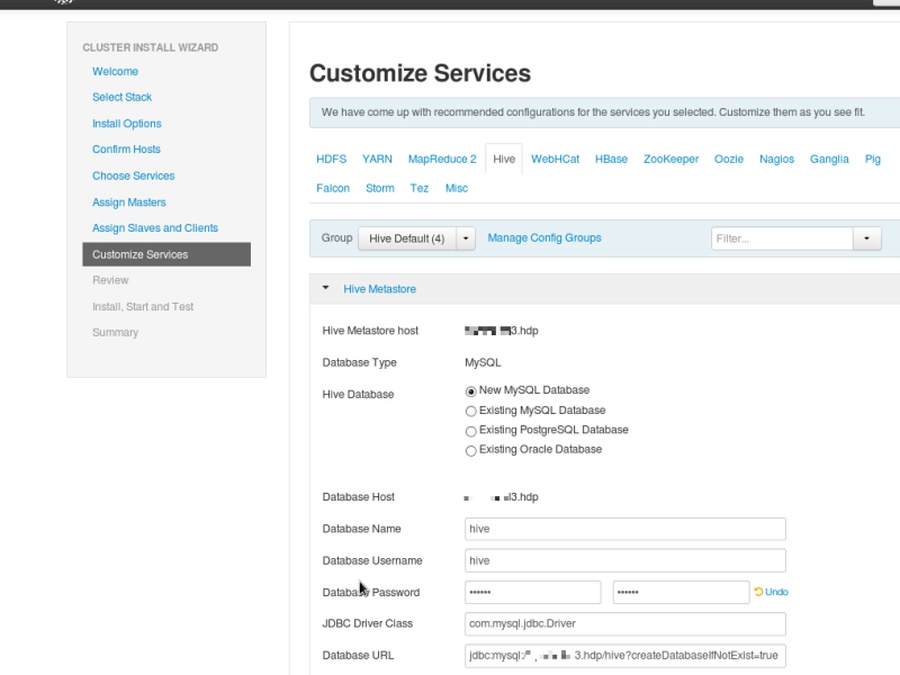
- Parse through settings
- Settings that must be changed are highlighted with red
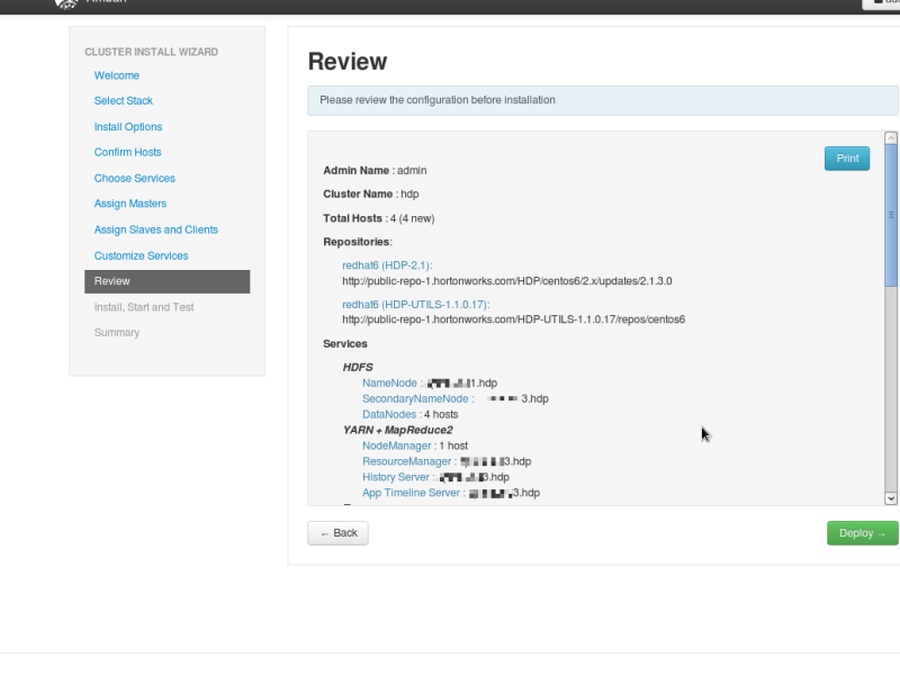
- Review the deployment of your cluster
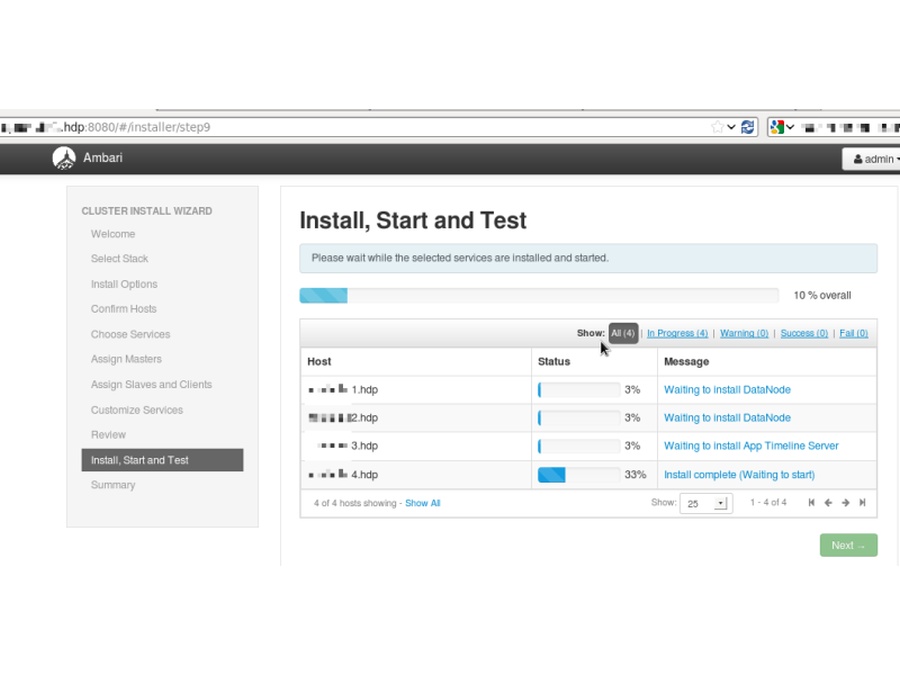
- Be patient for the deploy. It may be restarted if there are failures.
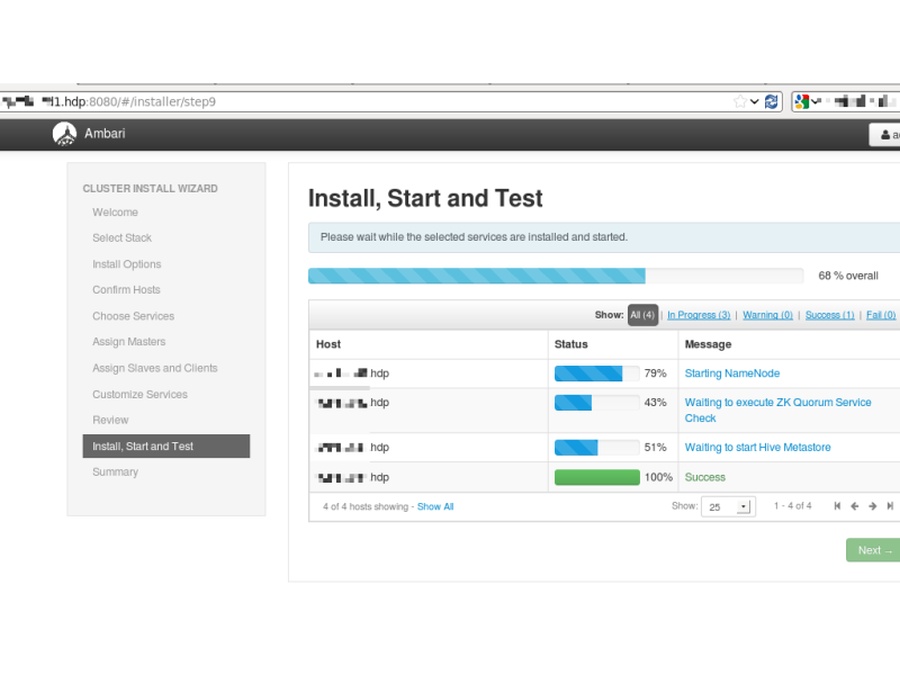
- Services will get started up after the deploy
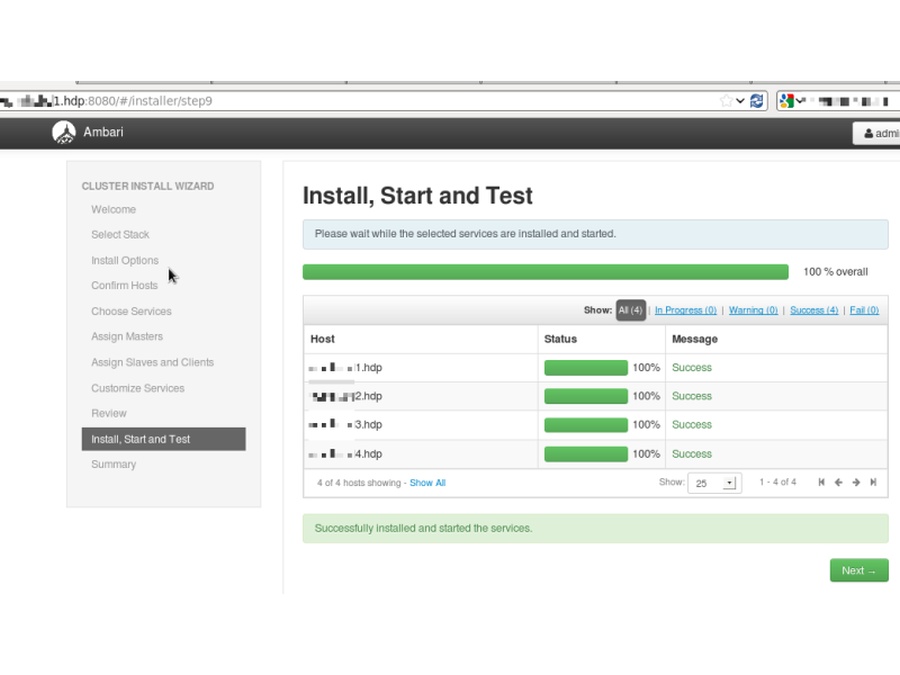
- Deploy finished with no errors
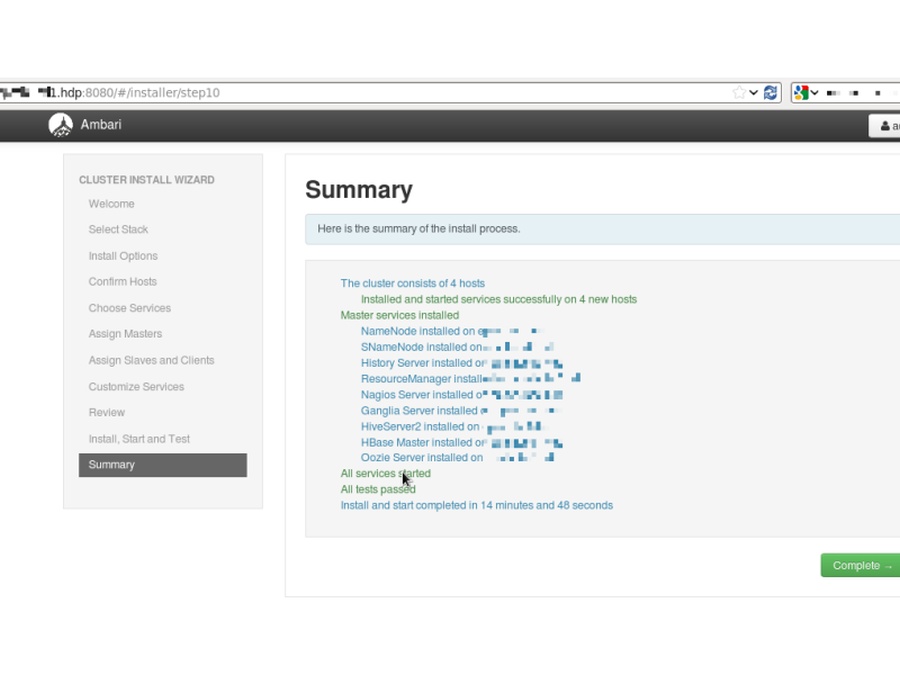
- Post deploy screen shows problems and error logs and a summary on the install process (hosts and services)
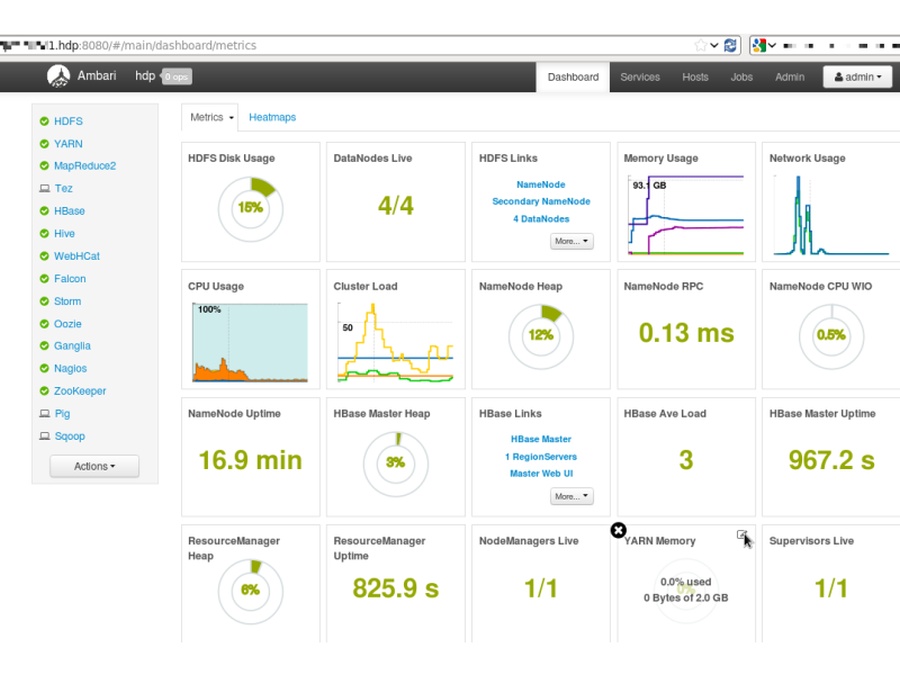
- Ambari uses Nagios for comprehensive monitoring with an easy-to-use Hadoop cluster monitoring dashboard that shows usage and status of each services
Troubleshooting Hadoop deployment, cluster
- Kickstart’s last lines might fail to run
- Check if Puppet is installed
- Check Puppet configuration /etc/puppet/puppet.conf both
- On master
- If autosign is on for new clients in the network
- And on child nodes
- If server and certificates are configured in the section
- On master
- Puppet master won’t start
- Check Puppet certificates on child nodes with
- puppet agent –test
- Check Puppet certificates on child nodes with
- Fail to load Ambari on localhost:8080
- Check if Ambari is installed and running
- Check if Ambari Agent is set on nodes with server attribute at /etc/ambari-agent/conf
- SSL cert problem is common: check if the certificates corresponds each other on master and agent, if those are not revoked or out of valid dateframe due to clock sync problems
- Check Ambari logs on master and agents too, if there are any SQL errors, reinstall if any
- Fail to register Ambari-Agents
- Update OpenSSL
- Check if /etc/ambari-agent config files have correct server settings
- Check /var/log/ambari-agent/ logs
- Always check all outputs of the custom script adding machines by using their MAC address
- If dnsmasq is altered at /etc/dnsmasq.conf
- Regarding DHCP
- If tftpboot contains the MAC address at PXEboot
- If the webserver has a corresponding kickstartx file and the webserver itself is accessible by the clients
- If Puppet has an entry for the new node on configuration
- If dnsmasq is altered at /etc/dnsmasq.conf
- Can’t access services of master
- Check IPTables from remote nodes: web server, TFTP, DNS, DHCP ports are open and working
- Check DNS resolution by pinging nodes from other nodes
- SSL certificate problems are common in Puppet and Ambari (which uses another instance of Puppet)
- Check if NTP is running
- Regenerate certificates for masters and agents
- In case of any problem
- Check if all services are up and running
- Check network configuration
- Check if services are accessible from agent nodes
- Always check logs
* /var/log/puppet- /var/log/ambari-server
- /var/log/ambari-agent
- /var/log/messages
- /var/log/